Showing posts with label process. Show all posts
Tuesday, March 5, 2013
Character Sketches
Working on the cover art for a fantasy book series. These are portraits of the two main characters. (And yes, there will be dragons)
Labels:
book cover,
characters,
female,
male,
pencil,
portrait,
process,
projects
Wednesday, July 25, 2012
Illustration Academy: Project #1
Some of you might have noticed in my last post that I mentioned I was attending the The Illustration Academy in Kansas City over the month of June. Well my time there has officially ended -- and a great time was had by all! I wanted to post some of the projects that I made while there and this is the first.
The assignment was to capture the spirit of the location BUT using no line work and no rendering. Only interesting shapes, values and hues. (Oh, and get a figure in there to help tell a story) I added an additional wrinkle of trying to communicate depth of space without using linear perspective; instead relying primarily on overlapping shapes and the human mind's natural inclination to "understand" certain shapes in certain ways.
Anyway, all this is starting to sound very art-talky but it sure made the project fun!
In this case I didn't stray far from the studio. The building that the Academy is held in is an old brick warehouse and is a wonderfully exhausting five flights up some creaky wooden stairs.
Monday, May 7, 2012
Knowlege Knugget: Photoshop Lasso Tool
Quick tip o' the day: When you select the "Lasso" tool in Photoshop and then press the "Option" key BEFORE you start drawing you can make a selection that switches seamlessly between the Lasso tool and the Polygonal Lasso tool. For example, the grey selection on the right was made in one quick and easy stroke. Give it a try.
Disclaimer: If this is a new feature for you and increases your productivity ever-so-slightly -- you're welcome! Enjoy!
If, on the other hand, this is old news to you and you've been doing this since B.C.S. (before Creative Suite) then -- why did you keep this to yourself? Wassup' with that?! Share the knowledge and help a pixel pusher out!
Disclaimer: If this is a new feature for you and increases your productivity ever-so-slightly -- you're welcome! Enjoy!
If, on the other hand, this is old news to you and you've been doing this since B.C.S. (before Creative Suite) then -- why did you keep this to yourself? Wassup' with that?! Share the knowledge and help a pixel pusher out!
Wednesday, February 8, 2012
Models: A different kind of sketching
These are in-progress sculpts of Patrick and Beth, the two main characters from "The Imagination Station" book series I've been working on. While I've already drawn these characters many times I've noticed that there are some angles that are, frankly, tricky. These models are meant to make it easy to draw our hero's from any point of view.
Tuesday, February 7, 2012
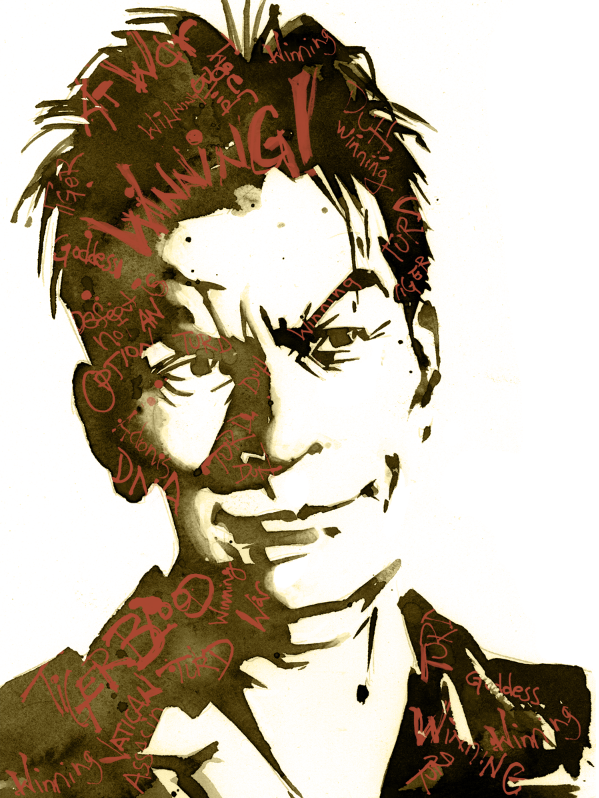
Portrait: Charlie Sheen
This is the same Charlie Sheen portrait as seen in my previous post only this time it was created using a "Gouache Relief" technique. This involves painting the white areas with gouache, letting that dry completely, then painting over the entire image with black waterproof ink. (That last bit is fairly scary to do) And finally rinsing the entire image under running water and scrubbing (lightly) over the surface so the ink and gouache washes away revealing the image.
This technique gives a finished result that looks a lot like a wood cut print and creates some really distinctive marks.
Tuesday, January 17, 2012
Tutorial: Perfectly Selecting Blackline Artwork
This is a quick little tutorial I made for my illustration class. First time I've had a go with iMovie -- and it was a pretty pleasant experience. Always weird to hear your own voice though. This is a technique I've been using for years in my illustrations.
Thursday, January 12, 2012
Portrait: Charlie Sheen
This is a new project for my illustration class.
The idea is to choose a celebrity and after researching him or her assign keywords that will determine how the viewer responds to the finished art. Not one to ask my students to do something I wouldn't, here is my interpretation of Charlie Sheen (circa spring 2011). My keywords were: "Manaical, Self Involved, Dangerous"
Here is the process I used to arrive at the finished piece:
I researched a bunch of photos of Charlie Sheen and chose one that had a single light source and strong cast shadows.
––––––––––––––––––––––––––––––––––––––––––––––––––––
Adjusted the photo so that it was more contrasty and the shapes that made up the features were clearer.
––––––––––––––––––––––––––––––––––––––––––––––––––––
The original photo did not have the feel/keywords I wanted so I modified his face to look more like the photos of Charlie Sheen when he was at his most volatile.
––––––––––––––––––––––––––––––––––––––––––––––––––––
Redrew the light and dark shapes so they could be transferred to watercolor paper
––––––––––––––––––––––––––––––––––––––––––––––––––––
Created and ink wash of painting of the photo, being conscious to use the brush to create quick angular strokes that would reinforce my keywords.
––––––––––––––––––––––––––––––––––––––––––––––––––––
I wanted to add a second element that would further reinforce my keywords and decided on the "catchphrases" Charlie would endlessly spout during this period. Again, actively using a mark making style that would suggest a person coming unhinged.
––––––––––––––––––––––––––––––––––––––––––––––––––––
The two pieces were composited digitally and this is the end result.
––––––––––––––––––––––––––––––––––––––––––––––––––––
What's really fun about this process is that you can easily substitute other equally compelling images to achieve a similar effect.
The idea is to choose a celebrity and after researching him or her assign keywords that will determine how the viewer responds to the finished art. Not one to ask my students to do something I wouldn't, here is my interpretation of Charlie Sheen (circa spring 2011). My keywords were: "Manaical, Self Involved, Dangerous"
Here is the process I used to arrive at the finished piece:
I researched a bunch of photos of Charlie Sheen and chose one that had a single light source and strong cast shadows.
––––––––––––––––––––––––––––––––––––––––––––––––––––
Adjusted the photo so that it was more contrasty and the shapes that made up the features were clearer.
––––––––––––––––––––––––––––––––––––––––––––––––––––
The original photo did not have the feel/keywords I wanted so I modified his face to look more like the photos of Charlie Sheen when he was at his most volatile.
––––––––––––––––––––––––––––––––––––––––––––––––––––
Redrew the light and dark shapes so they could be transferred to watercolor paper
––––––––––––––––––––––––––––––––––––––––––––––––––––
Created and ink wash of painting of the photo, being conscious to use the brush to create quick angular strokes that would reinforce my keywords.
––––––––––––––––––––––––––––––––––––––––––––––––––––
I wanted to add a second element that would further reinforce my keywords and decided on the "catchphrases" Charlie would endlessly spout during this period. Again, actively using a mark making style that would suggest a person coming unhinged.
––––––––––––––––––––––––––––––––––––––––––––––––––––
The two pieces were composited digitally and this is the end result.
––––––––––––––––––––––––––––––––––––––––––––––––––––
Labels:
conceptual,
ink,
male,
monster,
portrait,
process,
typography,
watercolor
Friday, December 30, 2011
Ed Emberly Illustrator
In a effort to branch out a bit I'm going to deviate from my usual postings of a project or doodle that I've done and introduce some things (images, text, video etc) of other illustrators who I think are cool.
I came across this Lynda.com video that they have made available featuring illustrator/author Ed Emberly. I've been aware of his work for years but never knew much about him. Well that has now been rectified! Take a look. (Be sure to hang in for the Paul Bunyan "promotional" poster. Totally worth it!)
Getting to know Ed
Ed Emberley, Children's Book Illustrator | by Ed Emberley
View this entire course and more in the lynda.com Online Training Library®.
Monday, November 7, 2011
New Book Cover: Tuesdays at the Castle
I just found out that a book I did the cover for is now available at your favorite bookstore!
Written by Jessica Day George, it got a great review blurb from Kirkus:
“This enjoyable romp turns mischief into political action and a stone palace into a cunning character. These kids are clever, as is George’s lively adventure. May pique castle envy.” —Kirkus Reviews
This is a splendid YA fantasy and I had a great time coming up with all kinds of cover concepts.
And what the heck, since you're here at my blog what better place to show some behind-the-scenes stuff:
In hindsight it would have been awesome if I had waited until Tuesday to post this -- ah well, enjoy!
Labels:
architecture,
book cover,
castle,
characters,
child,
conceptual,
process
Monday, June 27, 2011
Concept Sketch: Guy with huge sword
Projects of all stripes have been keeping me busy these last few weeks, but I thought I'd post a concept development test that I did this morning.
Monday, February 7, 2011
Sketch In Progress
Currently working on some pretty tight deadlines, so not a lot of time for sketching.
Here is about 15 min worth. I thought I'd have a go at this for a few minutes a day over the next few days.
Labels:
architecture,
asian,
landscape,
pencil,
process
Saturday, January 8, 2011
Recent Sketch

One of the things I require of my illustration students is that they be able to draw a cube accurately from observation. Figured I should take my own advice.
Labels:
architecture,
cube,
process,
sketch,
watercolor
Thursday, September 30, 2010
Understanding Cast Shadows
Tuesday, September 21, 2010
Monday, May 10, 2010
Recent Sketch: Inkjet Transfer

Tried out a little inkjet transfer technique.
Surprisingly easy (if a little messy)
- Simply print out a photo/sketch/whatever onto a piece of paper from your inkjet printer.
- Lay it inkside down onto a piece of watercolor paper.
- Spray both sheets with water.
- Burnish the print to transfer the ink.
- Discard inkjet print and keep playing with the image!
Wednesday, March 10, 2010
Subscribe to:
Posts (Atom)